
Home
General:
WARNING
FAQ
Links and reading
Animated project intro
Simple EEG instructions
Community Links
Main mailing list
Software-dev list
Wiki
SourceForge page
Hardware:
ModularEEG
Electrodes
Active
Passive
soundcardEEG
EEG Calibrator
EEG elsewhere
Olimex
Mindfield
Software
Neuroserver
BioEra
BrainBay
Brainathlon
ABI BCI
BWView
EEGMIR
ElectricGuru
BioExplorer
The text and graphics of this site are released under a Creative Commons license unless otherwise stated.
ModularEEG Case and Cabling
This document details how to make a case and the required cabling for your EEG. It is designed to be a part of the SimpleEEG documentation. It does not document how to put the circuit board in the case, merely how to make the case and the required cabling.
Required Parts
The following parts can all be obtained from an electronics store (except the warning)
- A print copy of the OpenEEG WARNING Document in PDF or html .
- Metal Case with internal dimensions of 100mm x 80mm x 60mm (this will contain the analogue PCB, or PCBs if you want to expand someday, lthough these directions do not cover it)
- Plastic case with internal dimensions of 130mm x 100mm x 120mm (the 130mm x 100mm needs to allow for the externals of the metal case, and the 120mm allows for the metal case + the mounting of a digital board. The case will probably need to be a little bigger to accomodate the internal side of the sockets, and the battery
- 9-pin d-sub Serial socket and some wire
- A 9-pin serial cable
- 34-pin IDC cable (PCB-to-PCB cable) (Someone said that this can be made by cutting a floppy drive cable down to size)
- 9V battery (not powerpack) and 9V battery clip
- Some kind of labelling device/method
- Multiply the number of these parts by the number of analogue boards you are using (normally just one)
- Some very supple, shielded 2-lead microphone cable for cabling the electrodes (including the DRL)
- 3x 3-pin mini-XLR male sockets sockets (to be mounted on the outside of the case for the electrodes)
- Pinhead female sockets (see FAQ for details about pinheads, but note that you need sockets, whereas "plugs" are pictured in the FAQ):
| Pins | Pieces |
|---|---|
| 2 | 3 |
| 3 | 3 |
Preparing the Parts
Case
Metal case
Fit the case(s) with:
- Mounting points for the Analogue PCB (all three)
- A slit for the PCB-to-PCB cable and the electrodes (including DRL) to go through (filed smooth for safety and protection from shorts)
Plastic case
Fit the case with:
| Item | Purpose | Label next to socket on outside of case |
|---|---|---|
| 9-pin, d-sub Serial socket | To connect to PC | Serial |
| The mini XLR sockets | The electrodes and the DRL | "Channel 1", "Channel 2", and "DRL"; Channels from boards 2 and 3 should be "Channel 3" ... "Channel 6" |
| Mounting points for |
Cabling
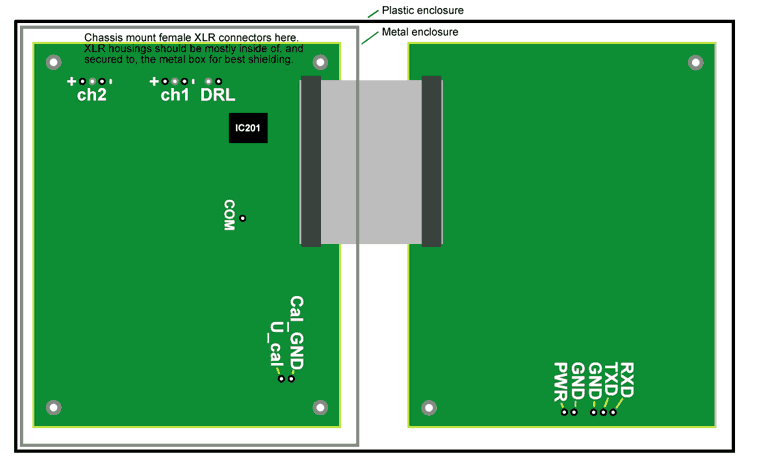
You may be aided in your understanding of this next section by the following picture of the general layout of the final product (note: this will not be complete at the end of this section; you will need to go back to the SimpleEEG documentation to get the complete picture).
- Hook the 9-pin Serial socket into the 3-pin Pinhead connector (using some wire). Hook the pins in the order RXD, TXD, GND1, so that the Serial pins of those names can be connected to the digital board pins of those names
- Hook the 9V battery clip into a 2-pin pinhead socket
- Do the following once for each analogue board you have
- Hook the remaining two 3-pin pinheads to the mini-XLR sockets (for electrodes),
using the shielded, 2-core microphone cable. Pin 1 of the 3-pin XLR should be
connected to the shielding, and the other end of the shielding should be connected
to the middle pin of the 3-pin pinhead. Pin 2 of the 3-pin XLR should be connected
to the end pin on the pinhead which will connect to the positive (+) terminal. You should
label this site with a '+'. Pin 3 should be connected to the pin at the other end
of the 3-pin pinhead, which will connect to the negative (-) terminal. Label this
side '-'.

- Hook one 2-pin pinhead to the remaining mini-XLR socket (for the DRL), using the
shielded, 2-core microphone cable. Pin 1 of the 3-pin XLR should be
connected to the shielding, and the other end of the shielding should be connected
to the 2-pin pinhead. Pin 2 of the 3-pin XLR should be connected to one of the cores
of the 2-core microphone wire, and the other end should be connected to the other
pin of the 2-pin pinhead. Pin 3 of the 3-pin XLR is unused.

- Leftovers
- You have a 2-pin pinhead left for the Calibration hookup, in case you ever need it (Olimex has already done calibration, so we hope we don't need it)
- You have a serial cable left over for connecting your ModularEEG to your computer (see Assembly for details)
- You have a labeling device/method left over for your next project